Labels

dinner (11) bread (10) dessert (7) quick and easy (7) cookies (6) pasta (6) muffins (5) snacky (5) Paleo (3) Pie (3) chocolate (3) lemon (3) basics (2) breakfast (2) shrimp (2) soup (2) Pizza (1) apple (1) beverages (1) cake (1) dressings/sauces (1) nuts (1) prep (1) pumpkin (1) side dish (1)

Thursday, March 31, 2011

Vanilla Pudding Experiment


I was  determined to make a yummy batch of vanilla pudding.

It took me over a week to accomplish.

Three batches of pudding AND chocolate meringues later, I have a favorite recipe! And I am officially sick to death of chocolate meringues. No more egg whites please. For a very VERY long time!

Wednesday, March 30, 2011

The Final Banana Bread Recipe


A few weeks ago I made a couple of batches of banana bread, attempting to improve it but ultimately deciding that the first recipe had been the best. You can recap that experiment here. Still convinced that I could improve the recipe, I made another batch with a couple of changes, and LOVED IT TO PIECES. So this morning I attempted to recreate the amazing version so I could share that recipe with confidence.

Monday, March 28, 2011

Homemade Wheat Thins


Wheat Thins! Wheat thins make me think of my mom :) When I saw this blog with the recipe, I was super excited. Bonus-- they're REALLY easy to make!

Saturday, March 26, 2011

Oil Chocolate Chip Cookies


This is my second attempt to find a delicious chocolate chip cookie that uses less butter-- not because I've suddenly stopped loving my beloved, mind you, but because of the incredible rise in price lately. So I checked out allrecipes and found a recipe that used vegetable oil! My sister makes (healthy) cookies with olive oil all the time, so I had high hopes for these cookies.

Here we go!

Friday, March 25, 2011

Fat Pizza

Some days, when nothing I make is turning out right, I just need to make a pizza.


Wednesday, March 23, 2011

Ricotta Gnocchi: Another Learning Experience

Confession: I've never tried Gnocchi. The first time I saw it I was 21 years old and it was in my sister's freezer. I went and looked it up online later. I've since heard of it and seen it too many times to count, but until a couple of weeks ago, had yet to try it. I should probably say that I still haven't really tried it, since I've only had my own.

When King Arthur Flour Co posed this recipe for potato gnocchi, I bookmarked it and told myself I'd get to it soon. When I found myself in the possession of a cup of ricotta cheese that was soon to go bad, and came across this recipe from Three Many Cooks for ricotta gnocchi, I made my decision. I printed the recipe and left it on the kitchen counter to stare me in the face when dinner time came around. 

Friday, March 18, 2011

Crunchy Oatmeal Chocolate Chip Cookies

Has anyone else noticed the rising cost of butter lately? Butter was on sale for $1.50 a box at Walmart a few weeks ago, and I went twice and both times there was an enormous gap on the cooler where it should have been. Hmph. This is seriously putting a damper on my dessert-making.

So I went in search of a cookie recipe that calls for shortening, even though the stuff seriously grosses me out. An easy solution-- the recipe on the oatmeal carton! That is, if you can really call it a "carton" when its cylindrical. Not only did this recipe use shortening, but it used (surprise, surprise) old fashioned oats, which I had accidentally bought a few weeks ago, intending to get the quick-cooking kind because they're much more cookie-friendly.

So off I went, scaling back to only 1/4 of the recipe, because I just couldn't stomach putting a full cup of vegetable shortening in something I was going to eat later. I'll post the full version though and let you make your own decisions.

I won't bore you with pictures of measuring ingredients and beating them together, but I will leave you with one important tip: these are very crunchy cookies. Not in the difficult-to-get-your-teeth-through way, but in a very crumbly way. They taste GREAT, but I highly recommend undercooking them.

Exhibit A:
These pictures are of the exact same cookie. After the first picture, I DID NOT put the cookies back in the oven. I let them cool until they looked like the second picture, then I moved them to a rack to cool completely. The first picture looks extremely undercooked, I know, but the cookies that looked like this had a slightly chewy center that was immensely satisfying. So please remove your cookies before they look fully cooked!

Oatmeal Chocolate Chip Cookies
Courtesy of Walmart brand Old Fashioned Oats

1 cup Vegetable Shortening
1 cup Sugar
1 cup Brown Sugar, firmly packed
2 Eggs
2 tbsp Milk
Note: I omitted the milk and used a full egg
1 1/2 tsp Vanilla
1 tsp Baking Soda
1/2 tsp Salt
4 cups Old Fashioned Oats
1 cup Chocolate Chips

  1. Preheat oven to 375 F
  2. Cream shortening and sugars together
  3. Add the eggs, milk, and vanilla, and beat well
  4. Add the rest of the dry ingredients and beat well
  5. Stir in the oats and chocolate chips
  6. Drop by the spoonful onto ungreased cookie sheets
  7. Bake for 13-15 minutes or until bubbly and deliciously undercooked
  8. Remove from oven and let stand for 5 minutes
  9. Remove and cool them completely on a wire rack

Thursday, March 17, 2011

Beef Empanadas

 Mmm. I have very distinct memories of my first beef empanadas. At least, I'm pretty sure that's what they were. I was 15 years old and in Florida with my very best friend and her family, just spending the night before hopping on a cruise ship the next day. We went to a Cuban restaurant for dinner, and these are the only thing I remember eating. And I remember they were AWESOME.

For some reason it's taken me 7 years to try making them myself.

I didn't get too picky looking for a Cuban recipe or anything, I just took the first recipe I came across. It tastes absolutely nothing like my first experience with them, but still really, really good.

 This is the dough. It takes all of five minutes to throw together. Then you just roll it out and use whatever you have handy to cut it into circles. I used a rubbermaid container with unusually sharp edges. Yay!

 This is some ground beef that's I've already seasoned. Sorry there is such a tiny amount of meat. It's just because I only wanted to make one or two servings because leftovers don't have very good luck in this house.

 This is the secret ingredient in the seasoning. I actually used a whole bunch of onion and some taco seasoning in addition to this, because the recipe called for it, but I think next time I would just use more of these tomatoes. Pureed first, of course, because I loathe tomato chunks.

 Whatever your seasoning decision, you just plop little bits of the filling onto each circle of dough.

 Then use a fork to seal the edges, and stick them in the oven! I love how cute they are, and how badly I wanted to eat the whole pan. Thankfully, my husband LOVED these and finished them off before I came back for seconds. That's REALLY GOOD NEWS in this house!

I especially like how they puff and how this little one almost looks like it doesn't have a seam at all! How very professional-looking!

I take pride in my food. Even if it's hardly worthy. Dear food, I love you!

And that's it! We had these for lunch, but I'm pretty sure they're supposed to be an appetizer or something. Or we could make oversized ones and eat them for dinner! With a vegetable of course.

Beef Empanadas
Yield: 38
Time: 10 minutes for dough // 15 minutes for filling // 20 minutes baking // TOTAL: 45 minutes

Dough
2 cups All-purpose Flour
1/3 cup shredded Cheddar Cheese
1/2 tsp Salt
1/2 tsp Baking Powder
1/4 cup Vegetable Shortening
3/4 cup Milk, warmed slightly
1 egg, beaten (for brushing the dough)

Filling
1 pound Ground Beef
salt, pepper, and/or seasoning salt
1 can Tex-Mex style Canned Diced Tomatoes
1/2 cup shredded Cheddar Cheese

  1. Start browning the ground beef with your desired amounts of salt and pepper. When it's just about done, dump in the can of tomatoes and let it simmer while you make the dough
  2. In a food processor, combine the dry ingredients (including cheese) for the dough
  3. Add the shortening and pulse until crumbly
  4. Slowly poor in the warm milk and pulse to combine
  5. Dump onto the counter form a smooth ball, adding enough flour to keep it from being sticky. 
  6. Divide the dough into four balls and work with one at a time, keeping the others covered so they don't dry out
  7. Roll out the dough to about 1/8 inch thick and cut circles that are about 3 inches in diameter
  8. Cut circles from all of the dough, re-rolling the scraps to get as many as possible
  9. Preheat oven to 375 F
  10. Add enough meat filling to cover half of the circle of dough, leaving a good 1/4 or 1/2 inch around the edge to seal
  11. Top with a small amount of shredded cheese
  12. Fold the top half over the filling and use a fork to press closed
  13. Arrange on a couple of baking sheets and brush with egg wash
  14. Bake for 18-20 minutes (they will puff slightly and be nice a golden)

Tuesday, March 15, 2011

Easy Pie Crust & Chocolate Cream Pie

As thrilled as I am to have conquered my first real pie crust, I admit there are sometimes that I just plain don't feel like getting out the food processor or waiting for the dough to chill while I live on in a great pie-less depression. Sometimes we need things that are easy.

This is easy.

This is about to be a pie crust. All that's in that lump there is some flour, salt, sugar, baking powder, oil and water. You can mix it all together and happily squish it up the sides of your pie pan in less time than it takes to preheat your oven!

Obviously we aren't going for looks here.

Once your oven is preheated, cook the pie crust for about ten minutes, then take it out and let it cool. You should leave your oven on, because I'm about to suggest making meringues, and you would want to be prepared for that.

Now, if you're like me a few months ago, you'll need to go shopping to get a big bar of semisweet chocolate. I use Baker's brand. If you're like me and this pie has suddenly been added to your dessert rotation, you should already have a few bars stashed in the cupboard. If you're REALLY like me, the chocolate hasn't suspiciously disappeared since your last pie-baking session, because no one in your house is tempted in the slightest by plain old chocolate. YESSSS.

So you'll need two squares of chocolate, all chopped up. Set this aside along with a teaspoon of vanilla and a tablespoon of butter, preferably at room temperature. While you're at it, set a hot pad/trivet down next to these items, since you won't want to go hunting for one when its time to use it.

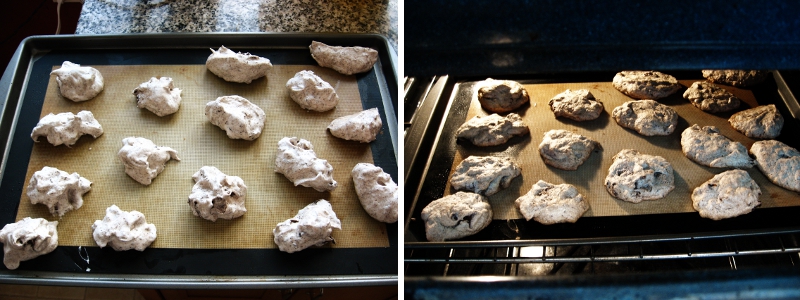
Then when that's all prepped you're going to need a small saucepan with sugar, corn starch, flour, and salt in it. What that's happily sifted together you need to add some egg yolks and milk. If you're concerned that those egg whites will go to waste, make these amazing meringues and celebrate the fact that you just made two really stupendous (and addicting) chocolate desserts!

When you've mixed it together, you can put the saucepan on the stove at medium heat, and stir slowly and constantly with a whisk (or sometimes I just use a good old metal spoon).

It will look like there isn't much happening at first, but if you keep on keeping on (and not getting impatient and cranking up the temperature!) you'll suddenly notice that it's thickening quite a bit.

When you see the first gloppy air bubble rise to the surface, look at the second hand on the clock and speed up to a very enthusiastic sort of whisking, and be ready to pull it off the burner when it's been one minute since that first bubble.

I'm terrified of ruining things and wasting four whole egg yolks, so I usually get to about 45 seconds and freak out that its getting so very thick and bubbly, and pull it off the stove a little early. So far it hasn't caused any problems.

In any case, pull it off the stove and (after remembering to turn the burner off) plop it down on the hot pad/trivet/whatever you want to call it, and QUICKLY dump in the prepped chocolate, butter, and vanilla. Whisk it around like mad before it cools off so that the butter and chocolate are fully melted and mixed in.

Again, QUICKLY, before it cools down and starts solidifying, grab a spatula and pour it into your pie crust.

For some reason, I almost always make this pie in the evening, so I let it cool for maybe an hour then stick it in the fridge overnight.

Most recipes tell you to put a piece of plastic wrap on it (touching the filling) to prevent a skin from forming. I personally like the skin, and I DON'T like the little water droplets that form and roll around on top of the pie, so I leave it uncovered. Suit yourself.

This should be served with fresh whipped cream, but I usually opt for cool whip, because it makes my life easier. And having heavy cream in the house is a dangerous thing. I would start using it in everything from kraft mac and cheese to oatmeal to who knows what else, and my waistline would not thank me. Cool whip it is!

Enjoy!

Pie Crust
See the recipe from the King Arthur Flour Company.

Bake the crust at 375 for about ten minutes.

Pie Filling 
Yield: Filling for one normal-sized pie
Time: I didn't time it, but I think less than half an hour from start to finish, including washing the pot and spatula.

1 cup Sugar
1/4 tsp Salt
2 tbsp Flour
2 tbsp Corn Starch
4 Egg Yolks
1 1/2 cups milk
2 oz chopped Semi-sweet Chocolate
1 tsp Vanilla
1 tbsp Butter

In a smallish saucepan over medium heat, combine all of the ingredients EXCEPT for the chocolate, vanilla, and butter, and heat slowly, stirring constantly.
When it gets thick and you see the first air bubble rise to the surface, increase stirring speed for one minute then remove from heat and quickly mix in the chocolate, vanilla, and butter.
Immediately pour into a prepared pie crust
Once cooled to room temperature (or at least not really hot anymore), place in refrigerator for a couple of hours.
Serve with whipped cream.

Monday, March 14, 2011

Double Chocolate Meringues


Don't make these. They're amazing and addicting and so so very evil.

Then again, eating a plate of these isn't as bad as eating a plate of normal double chocolate cookies. So if you're in the habit of eating full plates of cookies anyway, you might as well try these!

Start by preheating your oven to 350.

The ingredients: 3 egg whites (should be about 1/3 cup), 2 tbsp cocoa powder, 1/3 cup sugar, 3/4 tsp vanilla, 5oz semisweet chocolate (I used 5 squares of Baker's Semisweet).

Melt 3oz of chocolate. Chop the other 2oz up pretty small, but set it aside for later. If you use a microwave for this, only heat for about 30 seconds at a time, and stir between each round.

Beat your egg whites. Beat on low for the first 30 seconds, then move it up to medium once soft peaks have started to form. When you increase the speed, start adding the sugar a couple of tablespoons at a time, beating constantly. Add in the vanilla and beat for another minute or two.

These are not soft peaks. See how they stand up straight? This is how you know it's done. Time to add the chocolate!

Fold it in carefully. You don't want to deflate the egg whites! I think I deflated mine a little bit too much. My mistake: mixing the cocoa powder in with the melted chocolate. It made it way to stiff. You should fold in the melted chocolate (make sure it's still kind of runny) and then mix the cocoa powder with the chopped chocolate, and fold them in carefully.

The recipe said that this would make 40 2-inch cookies. I definitely only got 16, and I'm somewhat confident that they weren't 4+ inches.

Bake them for about 12 minutes. If you have more than one pan, one should be in the lower third of the oven and the other should be in the upper third. You should switch the pans halfway through the baking time.

Lucky for us, we're making chewy meringues here, not the kind that feel like styrofoam. So you don't have to wait nearly as long for them! Yay!

Move the cookies to a cooling rack and enjoy while they're still a little bit warm. They taste amazing!

They probably shouldn't have settled as much as mine did. I blame it partially on deflating the egg whites too much while mixing in the chocolate, and partially on the fact that I left out the cream of tartar, which helps stabilize whipped egg whites.

For the official recipe, click here.

Saturday, March 12, 2011

Lasagna


Ever since my first and second attempts at making my own pasta, I've been wanting to try tomato sauce. I admit that I was pretty convinced nothing was better than Prego (and so far, I haven't been proven wrong) but it's something I had to at least try. My goal was to make my own lasagna noodles and tomato sauce and make a little mini lasagna. Mini for two reasons. First, because something could go terribly wrong and I hate to throw food away. Second, because I'm the only one eating my creations, and as much as I love lasagna, I would be really depressed if I didn't get another chance to cook dinner for the entire week.

In any case, the precaution was helpful in the latter respect, but in the former I need not have worried! It was GOOD. I only wish I'd had sausage to add to the ground beef.

The noodles came out great! I've decided I really enjoy making my own pasta. This time I got it rolled out reeeeally thin, and ended up getting about twice as much out of it! The small rectangles on the cooling (drying) rack are all I needed for the lasagna, and that big piece underneath I had leftover to make some fettuccine!


The sauce was highly successful as well. The recipe for Tomato-Basil sauce came from Williams Sonoma The Weeknight Cook .

Assembly was quick and easy. Meat browned, added to sauce, and layered with the noodles and ricotta cheese.

I can't say I think lasagna is particularly photogenic, but I suppose I can get over it. I so very much enjoyed eating this!

The Pasta:
Yield: Enough for a shallow 9x9 inch lasagna
Time: 15 minutes prep // 15 minutes resting // 15 minutes rolling and cutting

3/4 cup All-Purpose Flour
1 Egg
salt

  1. Dump the flour on a clean counter top and make a little well in the center for the egg. Add in a few dashes of salt.
  2. Use a fork to beat the egg, gradually working in more and more of the flour mixture until you can easily knead it with your hands
  3. Knead it for a few minutes, making sure that all of the flour is worked in. If you need to add a tiny bit of water to accomplish this, that's ok. 
  4. Let it rest, covered with a damp towel, for about 15 minutes
  5. Roll it out as thin as you possibly can and cut it into the size and shape that you want.
The Sauce (throw this together while you let your pasta rest!)
Yield: About 3 1/2 cups sauce
Time: 5-10 minutes to gather the ingredients and tend to the garlic // 15-20 minutes simmering

2 tbsp Olive Oil
2 cloves Garlic, minced
3-4 tbsp* Tomato Paste (about half of one of those little cans)
1 large can Whole Plum (Roma) Tomatoes
3 tsp Basil (or about 5 leaves fresh basil)
Sugar, Salt and Pepper to taste

*Most likely you don't have a lot of uses for the other half of this can. It would be highly convenient to double this recipe and simply freeze the extra sauce.

Note: If you don't plan on running the sauce through a food processor to get rid of lumps, you can brown your hamburger first and just dump the sauce to cook right on top of it. If you're lump-phobic like I am, do the two things separately
  1. Saute the garlic in the olive oil for about three minutes.
  2. Add in everything else and simmer for 15-20 minutes, stirring occasionally
  3. Go roll out your pasta and cut it into noodles
  4. This would also be a good time to brown your hamburger if you didn't do it at the beginning
  5. While you let your noodles dry out for a few minutes, remove the sauce from the stove and run it through a food processor to get rid of all the tomato chunks. We don't like tomato chunks around here! 
  6. Stir in the browned ground beef
The Lasagna
Yield: One (possibly shallow) 9x9 inch lasagna
Time: 15 minutes pasta // 15 minutes sauce & ground beef // 15 minutes pasta // 15 minutes assembly // 30 minutes cooking. Total Time: 1 1/2 hours

Ground beef (mixing sausage in with this would be amazing)
Ricotta Cheese
Sauce
Lasagna Noodles
Mozzarella for topping
Yes, I realize I didn't give amounts. Lasagna is incredibly flexible!
  1. Make pasta
  2. Make sauce
  3. Brown ground beef
  4. Mix meat with sauce
  5. Don't boil your noodles if you made them yourself. They're ready to go right into your lasagna!
  6. Layer in 9x9 inch pan: sauce, noodles, ricotta, sauce, noodles, ricotta. Repeat until you're out of ingredients or you've filled the pan to the top, whichever comes first!
  7. Top with mozzarella cheese
  8. Cook at 400 degrees for 30 minutes or until the top is brown and bubbly

Monday, March 7, 2011

Potato-Topped Chicken Pie


You know those days when you just NEED to eat some form of chicken pie for dinner? 

Yesterday was one of those days.

AND I had a bunch of precooked chicken in the fridge waiting to be used up! It was meant to be. 

This is not, however, a quick and easy dinner recipe. This was long and involved (kind of) and helped me really grab my procrastination needs by the horns and...follow willingly. 

Recipe: Potato-Topped Chicken Pie
Time: 30 minutes prep (more or less?) & 30 minutes in the oven

  • Peel and chop about 4 small-medium potatoes and start them boiling. You're going to make these into mashed potatoes for the topping. Just use your favorite method when the potatoes are done. I probably don't need to hold your hand through this one.

For the pie filling:
  • In a pot, cook 1/2 a medium onion (diced) in 2 tsp butter and 2 tsp vegetable oil
  • When the onions are good and soft, add in 1/2 tsp minced garlic, 1/4 tsp salt, 1/4 tsp ground thyme, and 1/8 tsp pepper. You'll probably want more salt than that, but my husband accuses me of making everything too salty, so I tried to tone it down. I actually only put in 1/4 tsp and just had the salt shaker next to me at the dinner table. 
  • Only wait about 30 seconds or so before adding in 2 tbsp flour, and whisking it around for a good 2 minutes.
  • Then slowly pour in (while whisking) 1 1/4 to 1 1/2 cups chicken broth or stock (I can't say I really know the difference). 
  • Let it cook for about 5 minutes; it should thicken quite a bit.
  • Dump in about 2 cups precooked chicken, cut into little pieces, along with about a cup of frozen veggies. I was pathetically unprepared and literally only had corn. Somehow it still tasted awesome, but I would recommend something like peas and carrots. 
  • Remove from heat and stir in 2 tsp parsley.
  • Dump it into a pie plate (don't be like me and overfill the thing. When I plopped the mashed potatoes on top they made filling jump up and ooze like crazy all over the counter. mmm).
  • Spread the mashed potatoes on top of the filling. If the potatoes are too thick you'll have a really hard time doing this without pushing the potatoes to the bottom of the pie plate.
  • Oh, and at some point you should have preheated your oven. And since I have no idea what I'm doing (and casseroles tend to be pretty forgiving) I think I cooked it at about 375 for half an hour. It worked! 
Let it sit for a few minutes to cool off before scooping it onto your plate. It will help it thicken up a little bit and rescue the inside of your mouth from being burnt and then not being able to taste the meal at all.

I'm so unbelievably helpful.

Thursday, March 3, 2011

Banana Bread...Twice


I picked up some 29c/lb blackened bananas the other day that were just begging to be made into banana bread. I had an unusual hankering to actually follow a recipe for this one, especially since it belonged to a low-fat vegan cookbook, and I've never intentionally made anything vegan and was oddly worried that I would mess something up.

So loaf #1 was made with great anticipation of the first taste. Only...I didn't love it. I was a little bit disappointed. The amount of molasses really didn't float my boat, and I ended up slicing off one more piece to eat for breakfast the next morning, and giving the rest of the loaf to my dorm-dwelling friends who are starved for home-baked foods.

When I ate said slice of bread the next morning I discovered that a beautiful thing had happened overnight. The molasses WASN'T overpowering anymore! Give me back my loaf, people! Too late.

I was also too late to make loaf #2 exactly like loaf #1. I'd had a sudden urge to make a second loaf with some changes to the recipe, and already had it in the oven when I ate the slice of the original loaf. I expected to like my  adaptation of the recipe, but found that it would need some tweaking to really be perfect. It was overly dry and dense, and especially so because it's hard not to over-mix batter that's so dry.
So alas, I was left with a less-than-favorite loaf of bread.

The good news is that I only share the best! So here's the recipe for the original loaf:

Low-Fat Vegan Banana Bread
Originally from the Veganomicon Cookbook, taken from this blog.

Vigorously Mix:
   2 or 3 Ripe Bananas (depending on size), mashed up really well.
   1/4 cup Applesauce
   1/4 cup Canola Oil
   1/2 cup Sugar
   2 tbsp Molasses
Sift in:
   2 cups All-Purpose Flour
   3/4 tsp Baking Soda
   1 tsp Cinnamon
   1/4 tsp Nutmeg
   1/2 tsp Salt
Mix just until there are no more giant patches of dry mixture. NOT the time for vigorous mixing, my friends.

Bake for 45 minutes to an hour at 350. I only say an hour because my oven tends to be slow. You might want to keep an eye on yours between 45 and 50 minutes.

Then please, for heaven's sake, wait until the next day before you eat it. It will taste better.

Wednesday, March 2, 2011

Snickerdoodles


These cookies have stolen my heart. In the 20 minutes between printing out the recipe and putting the first scalding hot cookie in my mouth, I had no idea that my life was about to change. Thank goodness I had a room full of hungry men to keep me from eating the entire batch! 

I should note that I've always enjoyed snickerdoodles. In fact, before I found out that there were 680 calories in each heavenly cookie, I used to pray daily that my sister would bring them home from her job at Mrs. Field's Cookies. Thankfully, these little guys are not nearly that bad. They even have whole wheat flour! I think it adds a particularly nice touch. And I don't have to depend on anyone else to bring them to me! 


Snickerdoodles
From Allrecipes.com
Makes 21 silver-dollar-sized cookies

Preheat oven to 400.
Cream together 3/4 cup white sugar and 1 stick of butter.
Add 1 egg and beat well.
Stir together 3/4 cup whole wheat flour, 1/2 cup plus 2 tbsp all-purpose flour, 1/2 tsp baking soda, and 1/8-1/4 tsp salt (I went with the larger amount).
Beat into the butter/sugar/egg mixture.
Form little balls and throw a couple at a time into a mixture of 2 tbsp sugar and 2 tsp cinnamon. Shake the bowl around a little to evenly coat the balls of dough.
Bake until starting to brown at the edges. The original recipe said as little as 8 minutes, but I lost count of how many times I added 2 more minutes to the timer. I think I ended up around 16 minutes.
Transfer to a wire rack to cool, or eat them while they're still hot enough to burn your mouth. Either way, enjoy the living daylights out of 'em!

Followers