Labels

dinner (11) bread (10) dessert (7) quick and easy (7) cookies (6) pasta (6) muffins (5) snacky (5) Paleo (3) Pie (3) chocolate (3) lemon (3) basics (2) breakfast (2) shrimp (2) soup (2) Pizza (1) apple (1) beverages (1) cake (1) dressings/sauces (1) nuts (1) prep (1) pumpkin (1) side dish (1)

Sunday, February 27, 2011

Chicken Soup

I've been craving chicken soup all week. I'm in the middle of another cold, and I feel like I need some mothering. Since my mother is inconveniently located across the country at the moment (or, rather, I'm located across the country from her) I decided to make some myself! Not that she's ever been that into chicken soup...AND as it turns out, she's sick right now too. I wish I could have sent her some of mine!

Anyway, I've been wanting to do a whole chicken soup completely from scratch (making my own stock and noodles) for a while now, and this sounded like as good an opportunity as any. I made the pasta the day before and got right to work roasting some chicken. I didn't have a whole chicken, but I had a good assortment of chicken parts.
 These roasted for about an hour and a half at 375. I didn't pick that time or temperature for any particular reason, in case you're wondering. I have very little experience with these things, so almost everything is an experiment at this point. In any case, this worked!

 Here I separated the chicken and dumped the bones and skin into a pot with just enough water to cover. I simmered it for about 4 hours, because I read somewhere that one should let it simmer for three hours, and after that I just lost track of time.

 After removing the bones and skin, I simmered the broth with these guys for a while (less than an hour if my memory serves me correctly). I forgot to buy an onion and had to use powder. Silly me! And I chunked the celery up huge because I don't like that particular flavor to be overpowering.

I liked how the broth came out tasting (once I added salt and pepper at the end of all this simmering business). I think I used a half teaspoon each of the spices there. Speaking of which-- another note about my ignorance-- I had no idea what spices to use. I just happen to like these two, so I threw them in. If there are some unspoken rules about what spices one SHOULD use in chicken soup, please do let me know before I get arrested.


 Here I suddenly realized I don't have a mesh strainer and had to use my husband's french press to strain any lingering gunk out of the broth. I think he's forgiven me!

I got exactly 4 cups of broth out of this batch. I guess I expected more, but-- again-- I've never done this before. I stuck it in the fridge overnight and took it out in the wee hours of the morning to skim the fat off the top (hence the dark windows and blurry pictures)


 And here are my beloved noodles cooking in the chicken stock! Look how much they plumped! I was pretty excited about it, and had to remove about half of them to make room for the other ingredients.

Oh, and I actually cooked the carrots first, but took them out because I had no idea how long they (or the noodles) would take to cook. It turns out that the carrots took about 25 minutes and the noodles took closer to 10. After that I threw the carrots in along with some shredded up chicken and some frozen peas, and let everything simmer for another few minutes.

What I learned: Use way less pasta next time, and it would have been helpful if I'd broken it up smaller. Come to think of it, less of EVERYTHING. As you can see from the picture below, it turned out much less like chicken soup and much more like chicken, noodles, and veggies in chicken broth. Either way, it tasted GOOD.
Mmm. I feel better already!

Friday, February 25, 2011

Fresh Pasta: Take Two

After my attempt at Ravioli earlier this week, I was determined to get the hang of this pasta thing. So I whipped up a batch of wide noodles to use in a chicken soup, which will have to get a post of its own when I have the time.

 This time I used a fork till the egg was well mixed with some of the flour, so it didn't ooze all over the place or completely coat my fingers. I also covered the entire dough ball with a damp paper towel while it was resting, rather than just the top of the bowl that it was in.

MUCH thinner than my last attempt. Yay!

 Yep, I totally used that pizza cutter right on the nice counter top. I was careful! You don't really have to press hard to cut pasta dough.

 Now isn't that worthy of gawking at for a minute?

 I let it dry out like this overnight. It was nice and brittle after just a couple hours though.

Sigh. I've never been so proud! Actually, if you look too quickly at this picture it kind of looks like french fries... mmm those might have to happen sometime soon.

Anyway, here's the final product (cooking in chicken stock, which explains the weird color):

They were GOOD too. I could definitely go for some fettuccine alfredo next time. I'm also planning on making lasagna noodles this weekend to use up the ricotta from the ravioli experiment... it's been an awesome week of cooking!

Hawaiian Sweet Bread

One of my favorite things to make and eat.


Is there anything as beautiful as rising dough?

So soft, so plump...

So rewarding!


Hawaiian Sweet Bread
  1. Combine dry ingredients
2 1/3 cups All-purpose Flour
1/3 cup Sugar
¼ cup Instant Potato Flakes
2 tsp Instant Yeast
¼ tsp (slightly heaped) Salt
Pinch ground ginger
  1. Warm slightly on stovetop:
½ cup combination Milk and water (I go on the milkier side)
2 ½ tbsp Butter
1/3 cup Pineapple juice
Note: you'll see white chunks floating around. Don't worry about it; it's normal!
  1. Combine wet and dry ingredients and mix thoroughly
  2. Add
1 Egg
½ - 1 tsp Vanilla
  1. Beat until smooth
  2. Knead for 6-8 minutes. It should be soft and beautiful.
  3. Rise for about 1¼ hours
  4. Shape into loaf and put into loaf pan. This could mean just plopping it into a greased pan. I think the braid is cute and it takes all of ten seconds to accomplish!
  5. Rise for about 45 minutes
  6. Brush with an egg wash or whatever wash is your favorite. Mine today happened to be the egg/milk/oil/vanilla mixture that was about to become my husband's waffles.
  7. Bake at 375 for 15 minutes, then another 20 minutes covered loosely with foil (the top will get really dark, really fast otherwise). 

Thursday, February 24, 2011

Ravioli: A Learning Experience

For about a year I've been telling myself that any day now I'm going to try making my own pasta. I've read some recipes and tips, and the other day I saw a blog about ravioli, and I decided that I NEED TO EAT THAT RIGHT NOW. The writer claimed that even though you can get all fancy with your ingredients, it also works just fine to use plain old all-purpose flour and an egg, so I took her word for it and got ready to experiment!

Without even explaining the whole process, let me just tell you all of the things that went wrong:
  1. I got my fingers too wet too fast when I tried to mix the egg with the flour. It got seriously goopy and problematic. I had to keep going with only one hand just so that I could use a rubber scraper with the other hand to keep un-gunking the eggy hand. 
  2. My egg must have been smaller than the egg used by the recipe writer. Either that or my flour was a LOT more packed into that measuring cup. It took some serious effort to get the majority of the flour worked into the dough, and even then I didn't manage to get all of it in. The dough never really got smooth, and it was impossible to roll it as thin as I was supposed to. 
  3. The recipe for the filling was really messed up-- 1/2 an onion and only 2 tbsp cheese? That makes no sense. I decided it was supposed to be 2 tbsp per ravioli (it was supposed to make 3) but I still decided to only use 1/3 of an onion, and once I'd cooked them it still looked like too much so I only used half of that.
  4. I should have rolled the dough thinner (I tried!)
  5. I've never even cooked commercially-made ravioli before, so I had no idea how long it should take or how I'd know if it was done
  6. One ravioli started leaking, so the water was all cloudy with cheese and onions within the first 2 minutes of cooking them.
  7. Definitely should have used even fewer onions, and WAY MORE seasoning for the filling.
  8. Actually, I should have put the meat inside with the cheese and just put plain sauce on top.
  9. Even the pasta itself tasted bland. Is that possible?
  10. I also should have known that that was a lot more like two servings...and I have a pretty massive appetite.
So now that that's over with, let's see the pictures!


I love my volcano! Particularly the egg white that's coming to attack the camera.

 Look at all that leftover flour...sad. But I like my cute little ball of dough!


Monday, February 21, 2011

Lemon Poppyseed Muffins

Another first! Lemon poppyseed muffins! I'll admit that I actually didn't even know where to look for poppy seeds in the grocery store. It turns out they're right in with the spices, alphabetized and everything! So I grabbed myself a mini jar and a big ole lemon and marched triumphantly out the door! (After getting the rest of my groceries and paying for them, of course)

Sunday, February 20, 2011

Classic Apple Pie

Today I took a real Sabbath. I got up later than usual, I didn't worry myself to death over upcoming homework, and I spent the whole morning playing cards with my husband :) AND I made apple pie!

The fruits of my labor (including the corn chowder in the mugs in the background):
Believe it or not, I had never made a real pie crust before today. I'd heard horror stories of how hard it was and though I would enlist the help of a dear experienced friend to help me with my first one. But alas, I decided that today was the day, and did it on my own. I also have no idea why they say it's so hard. The whole process of chilling the dough slows things down, but it certainly wasn't difficult.  So here we go!


Flour, salt, and chopped-up butter go in the food processor until nice and crumbly.
You'll notice that I have an incredibly tiny food processor, so I actually had to do the top and bottom crusts separately. Anyway, add the ice water and pulse just until it comes together.

If you're me, dump out the first batch and do the other one. 

Then take some of the dough from one lump and add it to the other; bottom crusts need more dough. Then roll both into nice little disks and stick them in a plastic bag to chill for at least a half hour. Little tip-- roll the disk on its edge before chilling to help it roll out without cracking.

Meanwhile, peel 6 apples (or more!) and mix them up with some flour, sugar, and spices. 

Then roll out the bigger disk and stick it in the bottom of the pie plate. 
Fill the dish with the apples

And top with the top crust.
I've seen people use cute little pie crust cutters to make designs on their pies, and I'm a copycat (without any of the proper tools) so I used my little mini gingerbread man to do what I could! I like it :)

Then bake it at about 425 for half an hour, and 375 for another half hour.
And here's your beautiful pie! 


The Recipe:
Dough: (for one crust, double for top and bottom)
1 1/4 cups + 2 tbsp All-Purpose Flour
1/4 tsp salt
6 1/2 tbsp butter, chopped into little cubes and thoroughly chilled
1/4 cup ice water

Filling
6 Apples (I used 2 Granny Smith, 2 MacIntosh, and 1 Fuji)
2 tbsp lemon juice
2 tbsp flour
3/4 cups sugar (I would have liked it better with less, but I don't like it very sugary)
1/4 tsp Cinnamon
1/4 tsp Nutmeg
1/8 tsp Allspice

The recipe said to preheat to 500 degrees, and drop it to 425 once the pie is in the oven, so that's what I did. I can't pretend to know why in the world that was necessary.
So bake for half an hour at 425 and another half an hour at 375.

The End!

Saturday, February 12, 2011

Oops!


Do you know what this is?

It's a mistake.
 The poor loaf overfilled the pan and oozed onto the bottom of the oven. I caught that little burnt guy snuggling up with the bottom heating element.

The good news is that I'm smart enough to put a cookie sheet under the next loaf...
Eh, a lot of good that did me! 

Better news: after peeling the runaway bread off of the oven rack, it tasted GREAT.

Useful news: I have now updated my Cinnamon Swirl Bread recipe to say it yields THREE loaves rather than two. I think the original recipe said two loaves because it was meant to be plain bread. The whole "cinnamon swirl" part adds some volume.

Aren't you so glad you can learn from my mistakes?

And in case you're wondering, No, I haven't eaten six loaves of cinnamon swirl bread in the past two weeks. I've given lots of bread away, and these two loaves here are for a Valentine's Church Potluck.

Then again, I'm inclined to think that eating six loaves of bread would actually be quite enjoyable...minus the pesky weight gain that it might induce. But that's another story for another day! I have some dishes to wash...

Friday, February 11, 2011

Butternut Squash Soup


I love soup!

This past fall I made my first soup ever, and I'm in love-- especially with butternut squash soup, which I'd never even tried until I made my own! So here's a simple recipe for when you too need some cold-weather comfort.


Yield: 3-4 servings
Time: 25 minutes/45 minutes simmering/5 minutes finishing
  1. Chop 1/4 onion
  2. Chop 1/2 large butternut squash
  3. Cook the onions in some olive oil and a heavy dash of ground thyme
  4. When the onions are just beginning to brown, add about 3 cups of chicken broth and all of the squash
  5. Bring to a boil, then cover and let simmer until the squash is very soft
  6. Run it all through a blender (do it in small batches; hot liquids seem to expand while blending and overflow WAY too easily)
  7. Serve or store away for later
That's it! If you keep large amounts of bread dough in the refrigerator all winter long like I did, grab a chunk and bake a nice chewy roll to enjoy with your soup. Mmm...

Cinnamon Swirl Bread (A Condensed Version)


If you saw the rather rambling post about my favorite bread in the world and didn't think it looked worth reading, rejoice! Today I'm sharing the condensed version.

First, here's the basic recipe:

Yield: two standard bread pan loaves without cinnamon filling OR three cinnamon swirl loaves OR 6 mini cinnamon swirl loaves.
Time: 20 minutes mixing // 2 hours waiting // 2 more hours waiting // 2 more hours
waiting // 15 minutes filling // 1 hour waiting // 1 hour baking // 1 hour cooling = about 8
½ hours
1. Mix dry ingredients in a really big bowl.
   · 4 cups Whole Wheat flour
   · 3 cups Unbleached All-purpose flour
   · 1 1/2 tablespoons Instant/Bread Machine Yeast
   · 1 tablespoon Kosher Salt
   · 1/4 cup Vital Wheat Gluten
2. Mix wet ingredients in a medium bowl (should hold at least 6 cups)
   · 2 1/4 cups Lukewarm Water
   · 3/4 cup Melted Butter or Oil
   · 3/4 cup Honey
   · 5 Large Eggs
3. Mix together with a big fork at first, with a wooden spoon once it’s stiff. (dough will
be loose)
4. cover until it rises and collapses, about 2 hours
5. refrigerate for at least 2 hours
6. When ready to use, let warm to room temp for about 2 hours
7. Roll out dough and fill with cinnamon filling
   · ½ cup sugar with 2 tsp cinnamon PER LOAF
8. Roll up the dough and put in greased pan
9. Let rise for an hour—preheat oven to 350o F (175 o C)
10. Beat an egg, 1 tbsp water, and a dash of salt to brush over the loaf
11. Bake for 20 minutes then cover with foil
12. Bake for another 40 minutes
13. Cool completely on a wire rack before slicing

The great news about this is that you'll probably only make one of the two loaves at a time, leaving you with dough ready for another loaf in a couple of days! The picture above shows first a regular-sized loaf (made with half of the dough from this recipe) and the second picture is one of three mini-loaves made with the remaining dough.

Enjoy!

Thursday, February 3, 2011

My Favorite Bread

Warning: this is a ridiculously long post. Sorry about that, but the bread will be SO worth it.

I originally got this recipe from the Artisan Bread in 5 Minutes a Day blog, and it comes from their second book, Healthy Bread in 5 Minutes a Day. I was looking for something to make cinnamon swirl bread with so I could try out the baker's cinnamon filling I got when I visited the King Arthur Flour shop in Vermont. It came out so well I've been repeating it ever since (and eating half the loaf by myself as soon as it comes out of the oven!). For the sake of you only thinking me a mild pig instead of a severe one, I should note that this recipe makes two loaves, which I make one at a time. I only eat half of ONE loaf. And even that is an exaggeration to some extent...depending on the day.

So, enough about me! Onward to the bread!


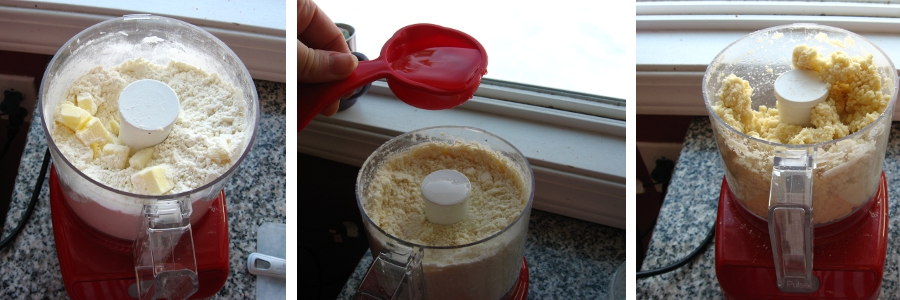
First put 4 cups of whole wheat flour and 3 cups of unbleached, all-purpose flour in a bowl, and add 1/4 cup gluten, if you have it. I happened to be out, so I added an extra 1/4 cup of whole wheat flour. Note: the original recipe called for white whole wheat, but I don't mind it a little bit more whole wheaty. 
 Next add 1 1/2 tbsp instant/bread machine yeast (NOT active dry. If you use active dry, you'll need to instead dissolve it in the warm water you'll be adding later. Do that now while you get the other things ready). Then add 1 tbsp kosher salt. I've used regular and it's come out just fine.
 In that big measuring cup (or something that holds slightly more than 5 cups...this was filled right to the top), put 3/4 cups oil or melted butter, 3/4 cups honey, 2 1/4 cups warm water (and your yeast, which should be foaming by now if you're using active dry yeast), and 5 eggs. No, that isn't a typo.
Then you mix it all around a little bit. It will feel like muffin batter.
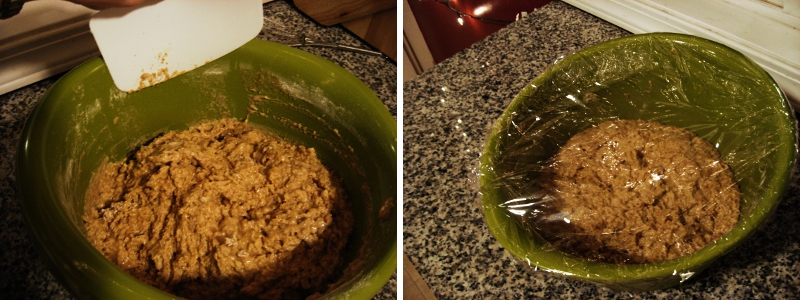
Don't be shy. Yeast breads don't get tough if you mix them vigorously! Once its well-mixed it should be thicker than muffin batter, but way too wet to knead. Good thing we aren't going to! Scrape it down so it isn't so messy, or else those traces all over the side get nasty and hard over the next 24 hours. Then sing praises to your bowl scraper (or go buy one!) and cover the bowl with plastic wrap.

It needs to rest at room temperature for 2 hours before being put in the fridge, and should be refrigerated for 2 hours before using. If you use it right away, it will need at least 2 hours at room temperature again before you should really bake it. I usually make the dough in the evening (I made my dough last night) and put it in the fridge overnight and take it out first thing in the morning and bake it whenever I get around to it.


So this morning I divided the dough in half and put one half back in the refrigerator. No, there is no known benefit of it being in a horizontally oriented container; my tall ones were all in use. Then I let the half in the bowl come to room temperature, about two hours.


When the dough is ready, plop it down on some flour and give it a quick knead, just enough to make the dough roll-able. I add as little extra as possible, because I like bread made from looser dough. Then prepare the filling. I do something like 1/2 cup sugar and 2 tsp cinnamon. Possibly a little heavier on the sugar. In this batch you can see some extra brown stuff at the bottom of the measuring cup; that's brown sugar. I thought I'd see if it got all gooey and caramely like monkey bread. It did! But I think I prefer the original.

 Then squish or roll the dough out; shape isn't important. Then sprinkle a good layer of that filling right on top of it. If you're the type that could rival me for love of butter, feel free to melt a few tablespoons and spread it on before adding the cinnamon sugar. Given my tendency to eat half the loaf in a sitting, I've long since given up the right to butter in this bread. I think it's still heavenly!
 Then use your giant spatula to help you roll up the bread, especially if you're like me and didn't add much flour. It should be well adhered to the counter by now.
 Finally, awkwardly and hurriedly lift the log and squash it unceremoniously into the bread pan. Again, shape is not important. You'll see here that I decided to only make half of the loaf into cinnamon bread. This is partly in hopes that I don't eat it all, and partly because we ran out of regular bread and my husband might want a sandwich later. So while I filled the cinnamon half (I only used about half of the filling you saw in the measuring cup), I had to get creative so the other half of the dough didn't take over the pan. I did manage to get some butter in between the two lumps of dough so that the loaves should be easier to separate.

Now cover the pan with plastic wrap and let it rest for 45 minutes to an hour. Toward the end of that time, preheat the oven to 350.
Beat up an egg, a tablespoon of water, and a dash of salt, and brush it all over the top of the loaf(ves).

 Put it in the preheated oven and check back 20 minutes later. Look at that puffy loaf! Time to cover it with foil and reset the timer for 40 more minutes (yours might need less time; I think my oven is slow).
Just a note about the foil: please be obedient and wait 20 minutes before covering it. On a previous batch I tested to see if it would rise higher if it was covered the whole time. It didn't! It sagged in the middle and the bread took over an hour and a half to finish baking. Don't do it!

 Here we are! take it out of the pan to cool on a rack so we don't get soggy edges. Even better-- rub some butter all over it! Good news-- the two loaves did separate easily, though not very evenly.
Make sure and wait till its almost completely cooled before slicing it open. It makes things gummy. Still tasty, but it's better if you wait.

So now that you've endured such a dauntingly long post, you really should go make this bread!

Followers